Sunday, December 19, 2010

Body Filler Work


Often Matt and I discuss which part of the project we least like to do. Drilling out factory spot welds and removing old seam sealer are 2 of our least favorites. Ranking up there with those is block sanding body filler. It's a nasty messy job! Looking forward to getting this part finished so we can clean up the shop. Dust is on everything! We don't have too much more of it to do and will be ready for a coat of primer.

Today we worked on the passenger side quarter panel seams. We welded in a new quarter panel on both sides, and the weld seams were ground down and we are skim coating them with body filler.

Click Images to Enlarge

Here are a couple of pics from a previous blog update showing the weld seams we are applying body filler to. These old pics are from the drivers side, and we worked on the passenger side, but you get the idea!


Here is Matt prepping the area with the DA sander for a final skim coat of filler.


We are using Evercoats Rage Extreme plastic body filler. If you haven't tried it, you should. This stuff finishes off so smooth there is no longer a need to finish your repairs with polyester glazing putty.


Mixing the filler and hardner is not an exact science. The amount of hardner to filler is primarily determined by the weather. Cooler weather requires a little more hardner or you will be waiting a while to be able to sand it. The next couple of pics are Matt and I mixing up a batch of filler.


Normally a thin line of hardner across the filler is enough, but added a little more to help with the cold weather.


Mixing / blending


Applying Filler to the weld seam where the quarter panel meets the rocker. From the factory there is a 90 degree flange that is spot welded to the horizontal surface of the rocker from inside the car. We elected to butt weld, and fill over it to shave the seam. Fitting the theme of a few other things we have shaved on the car.


I mean, got to get in there close and hold your mouth just right!


We use Durablocks for block sanding.


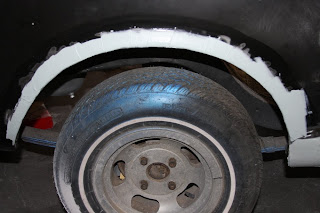
The quarter panel did not fit very well where it welds to the inner wheel well, and we ended up with some slight imperfections in the metal around the opening so we did a skim coat of body filler

Doing a little block sanding...


You can see the high and low spots being revealed and filled.


And here is the butt weld seam with a skim coat of filler.

Sunday, April 18, 2010

Passenger Side Fender

(Matt is like: "Grandaddy, you sure you know what you are doing? !" )

This is an interesting blog entry. This project began in June, 2009 and was finished up today! We are calling this the "3G Fender Restoration" Three Generations of Ramsey's worked on it. In June 2009 my dad (Dan, aka Grandaddy Williams!) came out for a visit. While he was here we put him to work. He didn't seem to interested in spending alot of time working on the car, so we just removed the old paint from the fender, and hammered out some of the dents. After he left and headed back to Tennessee, we put the fenders to the side and worked on the rear section of the car, as documented in previous entries.

This weekened, we finished off the passenger side fender that we started almost one year ago!

Click Images to Enlarge

In June 2009, we had started with some aircraft stripper to loosen the old paint. It has multiple layers of paint, primer, and body filler.

Matt and Grandaddy removing sanding old paint off.

Gary and Grandaddy removing paint.

So fast forward to today... we started the rust repairs. A few small areas were cut out and patches made, but the area right behind the front tire was in bad shape. Very thin, pitted, rust holes. We used an aftermarket patch from American Designer. The fit was decent, and we were able to cut below the factory body line to preserve it's shape. Matt holding the patch panel, with the tape showing our cut line.

Old rusted area cut out.

You can see the rust in the old section that we cutout compared to the new patch.

The support behind the fender had some surface rust on it, so matt masked off the area so we could blast it and treat it with a rust converter and a coat of rust inhibiting paint (Zero Rust)

Here is the new patch welded in

Close up of the seem butt welded. Also, we are shaving the factory logos and trim, so a few small mounting holes were also welded up.

Welds grounded down and cleaned up. It's ready for a skim coat of filler to finish it off.

Sunday, February 28, 2010

Passenger Side Door


Click images to enlarge

Now that the Driver door is finished, we moved on to the Passenger side door. This side is in much better shape. With the exception of a few small dents, the sheetmetal is in great shape. No Rust! The door had been previously repainted. There was a skim coat of body filler on the entire door, primer, and a couple of layers of paint on top of that.

Matt got busy removing all of old paint, primer, and body filler. We use a few different tools for paint removal, in this pic he is an 8" 80 grit sanding disc on slow speed on a variable speed sander / buffer.


Once we removed all of the materials, it exposed 6 wholes that were filled with body filler. This is where trim was previously attached. Matt punched out some little patch disc's and got prepped them for welding.


The old man knocked out the welding. (pro fab skills on display!)

Hot!


Nice flat Rosette weld, with good penetration


All welds completed


Matt took the lead on grinding down the welds. He didn't volunteer to do this. He received some strong encouragement that motivated him to complete the job.

Weld ground down, it's now ready for a small amount of filler to finish it off.


Driver Side Door

Now that we have the rear of the car all completely free of rust, we are working our way toward the front of the car. So next we are working on the Doors. This is the driver side door. The outer skin was in bad shape. It had taken a pretty big hit in an accident and had a fairly large crease on the body line. We decided to put a new skin on the door. Unfortunately the camera was acting up while we were doing this, so we don't have all the detailed pictures.

Click images to enlarge

Here is the door frame with the skin removed.

here is the inside of the skin after it was removed.


Inner door frame.

We missed a few steps in the process due to the camera, but here is inner door frame fully restored, all new hardware inside. New regulator, latch, handles, rollers, etc. It opens and closes as good as new. We also lined the new door skin with Second Skin's Damplifier sound deadner.


Here is the driver door on the car with the new skin.

We need to do some final tweaking to get the gaps fitting better, but it's pretty decent overall.


Rear Valance Work

Matt and I never said we were Chip Foose or Rad Rides by Troy! We have had our first major setback on the car. We replaced both full quarter panels, new rear frame rails, new crossmember, tail light panel. With all this being replaced, and some of it with repro sheetmetal, we had a situation where the rear valance didn't fit right to each quarter panel.

Never fret, we will fill the gap with sheetmetal and mold/blend the seam and make it disappear.

Click images to enlarge


Here you can see the gap between the rear valance and quarter panel.

We made a little template, and Matt cut out a piece of sheetmetal to fill the gap, here it is tacked in place.


Patch fully welded and smoothed.


The weld was covered with a think layer of water proof fiberglass reinforced body filler. It's made by Dyna-Glass.


The Dyna-glass was block sanded, and a couple of skim coats of Evercoat Rage Extreme filler were applied and block sanded. We spot primed the areas with PPG Epoxy primer.


Trunk Pans and Tail light panel complete

After the frame rails were repaired, we put in the new cross member and trunk pans. The trunk pan installation was probably the easiest things we have done on the car to date. Piece of Cake!

Click images to enlarge


Here you can see the driver side trunk pan welded in, gas tank installed.


Closeup of the Rosette Weld technique (plug weld).


Here is a shot of both pans in, before we put welded the tail light panel in.


Most of the sheetmetal we have put on the car has been reproduction pieces stamped in China. It's cheap, but usually doesnt fit well. Since the tail light panel is a prominent part of the rear of the car, we spent the extra $$$ and got the stamping from original Ford tooling.


And here is a shot of the rear of the car with quarter extensions and decklid isntalled with the new tail light panel... it's coming along slowly but surely...