Click on images to enlarge.
It's been a while since the last update. We have made progress, but it's been slow lately. The quarter panels appeared to be in decent shape and thought we would just patch the lower rear portion behind each wheel where water collects, but upon removing the paint, alot of cancerous rust was exposed, so we decided to do quarter panel replacements in the rear.
The green tapeline represents the area we thought we were going to cutout and replace that lower area.


As you can see, the there is some pretty nasty cancer on a compound curve, and would be difficult to patch, plus once you see what was behind this, you will see why the decision was made to cut it all out.
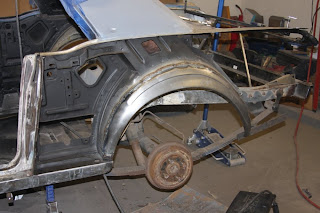
OK, so here it is all cut out. The outer edge of the wheel house is in bad shape.
Here is some is bracing we put in place in the rear section of the car to keep everything in tact while the major structural areas were cut out.
So here is the new full quarter panel mocked into place with sheetmetal screws and clamps to hold it temporarily. You can see the gap to be butt welded is decent for the most part, except for a bout a 8" section. For that wide gap, we made a backing strip and plug welded it to the new quarter panel.
But before we welded on the new quarter panel, we removed all the surface rust from the inner structure and treated it picklex20 to convert the remaining rust, and top coated it with Zero rust. The lower part of the inner wheel house was repaired by but welding in an replacement panel. Looks alot better than the first pic posted above, don't you think?!?!
OK, so on to welding the new quarter panel in place. Just like all sheetmetal but welds, we put tack welds about 1-2" apart skipping around to prevent warping the panel by putting too much heat in it, then after all the tacks were 1-2" apart, we welded between them with a small stitch weld.
A few plug welds where the new quarter panel attaches to the original decklid reveal.
From the factory, the quarter panel spot welds to the rocker on the inside creating a seam on the outside. We decided to weld the seam on the outside and smooth it down for a "shaved" look. We plan to do something similar with a number of other factory seams on the car.
The last step is to smooth all the welds down to get them ready for a skim coat of lightweight body filler and epoxy primer.
While we had the quarter panel off, we took time to recondition the quarter windows, and install new window regulator. Before you could barely roll them up and down, now work good as new.


HEY YOU GO GUYS , LOVE MAMA AND MOTHER
ReplyDeletenice work guys , this is going to be a cool ride, keep a blogging !
ReplyDeleteGreat idea to work on the quarter windows while the panel was off. They are a pain to remove through that access point. Great job and keep with the updates!
ReplyDeleteYou are doing an excellent job... keep up the good work!
ReplyDeleteHow did it turn out? I did this 10 years ago to my 65 convertible... a labor of love for sure.
ReplyDelete